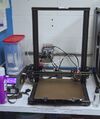
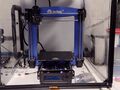
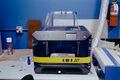
Creality CR10S
| Creality-CR10S |
|---|
|
|
| 3D Printer |
|
Brand: Creality
Materials: ABS, PLA, PETG |

Description
The Creality CR-10S V1 is a cartesian 3d printer with a relatively large build volume. It is built primarily using 4040 and 4080 extruded aluminum with the beams running on the X axis being constructed of 4040 aluminum and all other beams being constructed of 4080 aluminum. The axes on the CR-10S are constructed using shielded bearings and acetal running wheels which provide maintenance free operation. The axes are constructed in a Prusa format with the Y axis moving the build plate, the X axis moving the extruder, and the Z axis moving the X axis carriage.
Software
Cura has been used to slice models for loading onto this printer. It takes Marlin-flavor G-code.
Start Code
M201 X500.00 Y500.00 Z100.00 E5000.00 ;Setup machine max acceleration
M203 X500.00 Y500.00 Z10.00 E50.00 ;Setup machine max feedrate
M204 P500.00 R1000.00 T500.00 ;Setup Print/Retract/Travel acceleration
M205 X8.00 Y8.00 Z0.40 E5.00 ;Setup Jerk
M220 S100 ;Reset Feedrate
M221 S100 ;Reset Flowrate

G28 ;Home
M420 S ;Activate bed leveling

G92 E0 ;Reset Extruder
G1 Z2.0 F3000 ;Move Z Axis up
G1 X10.1 Y20 Z0.28 F5000.0 ;Move to start position
G1 X10.1 Y200.0 Z0.28 F1500.0 E15 ;Draw the first line
G1 X10.4 Y200.0 Z0.28 F5000.0 ;Move to side a little
G1 X10.4 Y20 Z0.28 F1500.0 E30 ;Draw the second line
G92 E0 ;Reset Extruder
G1 Z2.0 F3000 ;Move Z Axis up
Firmware
The 3d printer was configured using the configuration file example found in Creality/CR-10S/CrealityV1 and Marlin version 2.0.9.5. Future changes may include adding more bed leveling points and an upgrade to the latest version of Marlin. Additionally, the leveling grid may start from the previously recorded leveling point instead of starting at a 0.2mm offset.
History
The Creality-CR10S was donated by Kyle. Thanks.
The glass build bed was donated by Michael.
Hotend
The hotend was previously clogged with a giant blob of PLA. Please watch your prints through the first layer at least. Not all prints will succeed, but you are more likely to succeed after the first layer is printed.
The thermistor on the hotend was replaced on 2022-07-20. Problems were noted in June.
Bed
The build surface was blue tape when the printer was first donated. The build surface was the Creality "Carborundum" tempered glass bed. As of 2022-08-22, the bed is binder-clipped, PEI coated steel.
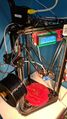
Controller
The mini USB B connector on the controller board was previously destroyed. The printer is now connected to octoprint using a hardwired USB A cable. Thanks Yangbot.
Operators' Log
2022-08-26 Yangbot, entered by Brandon
Bed adhesion issues noted when printing bike handlebar spacers.
2022-08-28 Brandon
Bed adhesion issues confirmed.
Bed leveling was completed successfully, but there is a significant dip in the center and center, right side of the 3d printer bed. Bed leveling shows concerning data:
| 0.2mm leveling data | ||
|---|---|---|
| 0.225 | 0.225 | 0.275 |
| 0.225 | -0.050 | 0.000 |
| 0.275 | 0.250 | 0.300 |
2022-09-02 Brandon
Nozzle was severely clogged with burnt plastic. Nozzle replaced.
The clogged nozzle could have caused the issues on 2022-08-26, but a bed leveling was also performed. Additionally, extrusion on the first layer is increased to 120%.
2022-09-03 Brandon
Bed leveling completed and bike handlebar adapter from Thingiverse successfully printed.
The bed is still severely unlevel in the middle and center-right corner.
In order to adhere to the rough PEI surface, the printer was leveled 0.1mm lower than the measured height. This is done so that the first layer of extruded plastic will flow around the rough PEI coated texture on the bed and create a stable mechanical bond.
2022-11-30 Betsy, entered by Brandon
USB port broken during printer shuffling and repaired/replaced by the yangbot.
Although it was once an issue, it is no longer an issue. Do not place stress onto the USB connector and always check the print area for things that may come into contact with the printer while it is in motion.
2022-12-06 Brandon
The last print performed yesterday at 2022-12-05 23:50 did not succeed. The filament was not loaded during the print, and a first-layer inspection was not completed.
Nozzle is further from the printer platform than normal. This may be the result of a previous maintenance action on the 3d printer or from a previous operator failing to save the printer bed leveling data into EEPROM.
The issues were resolved by turning bed leveling on before starting the print. m420 s1 applies bed leveling and should be run after the printer homes axes.
2022-12-14 Brandon
Previous operator logs did not note other dips in the 3d printer surface between the center and rearmost leveling points. It is theorized that a more granular UBL grid would be able to compensate for these points in the future.
The fan was replaced with the Y.S. Tech YW04010012BSS previously selected for the Zortrax. Although the printer probably works, it is was placed into delta stale status since a minor qualification print with the new fan is required.
The printer successfully printed the camera angler upgrade for itself on the same day, and the printer was removed from stale status.
2023-01-05 Brandon
Print completed without note.
2023-01-10 Brandon
"Travel :: Extrusion Combing" turned off in Cura; it should have been on the entire time. This setting was changed to "Not on outer surface."
2023-03-09 BLu
YACS printing was successfully completed on this printer. It is recommended that the fan speed be adjusted since the printer exhibited print curl during YACS printing.
The printer also experienced a collision with the cables connecting to the X axis carriage and this caused the carriage to become un-level. The carriage and bed were leveled and the printer was tested with YACS again.
2023-04-01 Brandon
Printing with PETG led to strange inconsistencies that may be related to hydrated filament. These largely interfered with the attempted transparent printing.
It is noted that a comprehensive list of changed settings has not been posted to the wiki. This section aims to fix that deficiency. The following settings are applied to the printer:
| Section | Setting | Value |
|---|---|---|
| Quality | Initial Layer Height | 0.3 mm |
| Initial Layer Line Width | 150 % | |
| Material | Initial Layer Flow | 105 % |
| Speed | Initial Layer Speed | 12 mm/s |
| Enable Acceleration Control | ✅ | |
| Travel | Retraction Distance | 4.0 mm |
| Retraction Speed | 60 mm/s | |
| Retraction Minimum Travel | 1.0 mm | |
| Combing Mode | Not on Outer Surface | |
| Z hop when Retracted | ✅ | |
| Z hop Height | 0.4 mm | |
| Build Plate Adhesion | Build Plate Adhesion Type | Brim |
| Brim Width | 4.0 mm | |
| Walls | Z seam Alignment | Shortest |
2025-04-06 Brandon
The YS-Tech fan was replaced with a 24v dual ball-bearing fan purchased from Ali.
The 24v dual ball-bearing fan was replaced with a 12v sunon fan from the stockpile.
2025-09-09 Brandon
There have been a lot of changes to the printer. The entire hot end assembly is replaced with a QED Hot End System with direct drive and a v6 clone.
Additionally, a Z synchronization system was added and the firmware was recompiled with a version that supports input shaping.
Other 3D Printers
This is a part of our ongoing effort to document our 3D printers.
RepRap Mendel 3D Printer