Pulse XE: Difference between revisions
mNo edit summary |
|||
| Line 24: | Line 24: | ||
The printer is in a printer enclosure. | The printer is in a printer enclosure. | ||
== | == Operators' Log == | ||
=== [[User:Blu | BLu]] 2022-09-22 === | === [[User:Blu | BLu]] 2022-09-22 === | ||
This section contains information based on the initial inspection and acceptance notes of the Pulse XE printer by BLu. This info may be incorrect or otherwise outdated. Please refer to the information preceding this section. | This section contains information based on the initial inspection and acceptance notes of the Pulse XE printer by BLu. This info may be incorrect or otherwise outdated. Please refer to the information preceding this section. | ||
Revision as of 03:38, 6 January 2023
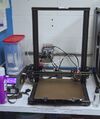
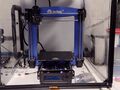
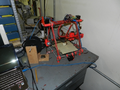
 Location: Electronics Room |
| 3D Printer |
|---|
| Brand: Matterhackers Model: Pulse XE |
Operational Information
An operation guide will be written in the near future.
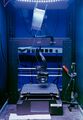
The printer is in a printer enclosure.
Operators' Log
BLu 2022-09-22
This section contains information based on the initial inspection and acceptance notes of the Pulse XE printer by BLu. This info may be incorrect or otherwise outdated. Please refer to the information preceding this section.
Experiment 1: Matter Control
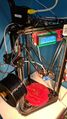
The printer USB port was not connected to any computer when found on 2022-09-22. BLu connected the printer to the Toaster.
The first Matter Control print attempts with the Pulse XE resulted in a large gap between the bed and the print. After trial and error, a nozzle offset of 3.4mm was found to place the print in the correct Z-offset for bed adhesion. The first print; however, did not print correctly.

The intermittent extrusion problems found during the first print were observed to be solved after extruder motor cleaning. Large amounts of plastic crud were clogging the area inside the extruder and were preventing the extruder gears from maintaining a good grip on the plastic.
A successful ChatLowPoly print was demonstrated after bed level adjustment and extruder cleaning.
Experiment 2: Cura
Extrusion under Cura was inconsistently observed to be far from the bed. The center section of the print would be too close to the bed, but the exterior was found to be too far from the bed.
Further investigation into the printer settings would show the following leveling mesh:
| R\C | 9 | 8 | 7 | 6 | 5 | 4 | 3 | 2 | 1 | 0 |
|---|---|---|---|---|---|---|---|---|---|---|
| 9 | ||||||||||
| 8 | -3.083 | -3.370 | -3.655 | -3.910 | -4.098 | -4.257 | -4.398 | -4.595 | ||
| 7 | -3.080 | -3.355 | -3.633 | -3.880 | -4.073 | -4.205 | -4.375 | -4.585 | ||
| 6 | -3.045 | -3.320 | -3.600 | -3.875 | -4.065 | -4.198 | -4.370 | -4.560 | ||
| 5 | -3.040 | -3.305 | -3.608 | -3.905 | -4.020 | -4.175 | -4.348 | -4.560 | ||
| 4 | -3.013 | -3.285 | -3.575 | -3.902 | -4.028 | -4.182 | -4.368 | -4.570 | ||
| 3 | -3.053 | -3.325 | -3.577 | -3.845 | -4.045 | -4.223 | -4.382 | -4.548 | ||
| 2 | -3.080 | -3.323 | -3.618 | -3.845 | -4.063 | -4.248 | -4.415 | -4.625 | ||
| 1 | -3.122 | -3.395 | -3.650 | -3.885 | -4.115 | -4.310 | -4.467 | -4.668 | ||
| 0 |
The leveling mesh is incomplete, and it was hypothesized that missing values would default to 0 which would cause the printer to print 3.9mm above the bed on average. The missing values were filled in as grey in order to test this hypothesis in the following table:
| R\C | 9 | 8 | 7 | 6 | 5 | 4 | 3 | 2 | 1 | 0 |
|---|---|---|---|---|---|---|---|---|---|---|
| 9 | -3.100 | -3.1000 | -3.400 | -3.700 | -3.900 | -4.1000 | -4.300 | -4.400 | -4.600 | -4.700 |
| 8 | -3.100 | -3.083 | -3.370 | -3.655 | -3.910 | -4.098 | -4.257 | -4.398 | -4.595 | -4.700 |
| 7 | -3.000 | -3.080 | -3.355 | -3.633 | -3.880 | -4.073 | -4.205 | -4.375 | -4.585 | -4.700 |
| 6 | -3.000 | -3.045 | -3.320 | -3.600 | -3.875 | -4.065 | -4.198 | -4.370 | -4.560 | -4.700 |
| 5 | -3.000 | -3.040 | -3.305 | -3.608 | -3.905 | -4.020 | -4.175 | -4.348 | -4.560 | -4.700 |
| 4 | -3.000 | -3.013 | -3.285 | -3.575 | -3.902 | -4.028 | -4.182 | -4.368 | -4.570 | -4.700 |
| 3 | -3.000 | -3.053 | -3.325 | -3.577 | -3.845 | -4.045 | -4.223 | -4.382 | -4.548 | -4.700 |
| 2 | -3.100 | -3.080 | -3.323 | -3.618 | -3.845 | -4.063 | -4.248 | -4.415 | -4.625 | -4.700 |
| 1 | -3.100 | -3.122 | -3.395 | -3.650 | -3.885 | -4.115 | -4.310 | -4.467 | -4.668 | -4.700 |
| 0 | -3.100 | -3.100 | -3.400 | -3.700 | -3.900 | -4.100 | -4.300 | -4.500 | -4.700 | -4.700 |
This hypothesis was true, and the printer was able to print successfully albeit with the printhead still slightly too low.
Analysis of the leveling mesh shows a consistent gradient from the left side to the right side of the mesh. It is possible and likely that the X-axis carriage is misaligned from printer assembly. The Z-axis steppers have no method of self-alignment and must be correctly aligned from assembly in order for the X-axis to be level. Furthermore, the "DC-offset" of -3.9 mm in the table is evident of a missing spacer screw on the Z-axis proximity sensor path. Visual examination of the printer confirms that an empty threaded insert exists in the Z-axis proximity sensor path. These findings will be experimented on further on a later date.
BLu 2022-12-25
The PulseXE is now operational with an attached OctoPi.
Many experiments were performed with startup leveling, and the final leveling startup GCODE is now on the Toaster.
Other 3D Printers
This is a part of our effort to document our 3D printers. Here is a collection of our other 3D printers.
RepRap Mendel 3D Printer