CNC Mill: Difference between revisions
| (7 intermediate revisions by the same user not shown) | |||
| Line 44: | Line 44: | ||
== Workpiece Examples== | == Workpiece Examples== | ||
<gallery mode=nolines> | |||
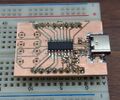
File:Example_CNC_Milling_ch552_usbc_RS.jpg|CH522G Breakout Board with USB-C | |||
File:Placeholder.jpg|Bicycle "Bow Tie" Stuff Holders | |||
File:Placeholder.jpg|LED Bases with Speakers | |||
</gallery> | |||
== Supplemental Resources == | == Supplemental Resources == | ||
| Line 55: | Line 60: | ||
Try to use G54 instead of G53 because it's less scary. | Try to use G54 instead of G53 because it's less scary. | ||
[[Category:Equipment]] | [[Category:Equipment]] | ||
=== FlatCAM Parameters === | |||
There are three different types of operations that go into CNC milling a PCB: hole drilling, trace isolation, and edge milling. Each of these operations will get its own section under this guide. | |||
==== Hole Drilling ==== | |||
Hole drilling is accomplished with the variety of 1/8" shank jobber drills provided next to the CNC. The following equation is used to calculate the length that the drill needs to be passed into the PCB in order to clear a hole: <math>\dfrac{d_{drill} / 2}{\tan(65^{\circ})}+1.65\text{mm}</math>. A tabular version is provided below for each 0.1mm increment: | |||
{| class="wikitable" | |||
! | Drill Diameter || Depth | |||
|- | |||
| 0.6 || 1.77 | |||
|- | |||
| 0.7 || 1.79 | |||
|- | |||
| 0.8 || 1.82 | |||
|- | |||
| 0.9 || 1.84 | |||
|- | |||
| 1.0 || 1.86 | |||
|- | |||
| 1.1 || 1.88 | |||
|- | |||
| 1.2 || 1.90 | |||
|- | |||
| 1.3 || 1.92 | |||
|- | |||
| 1.4 || 1.94 | |||
|- | |||
| 1.5 || 1.96 | |||
|- | |||
| 1.6 || 1.98 | |||
|- | |||
| 1.7 || 2.00 | |||
|- | |||
| 1.8 || 2.02 | |||
|- | |||
| 1.9 || 2.04 | |||
|- | |||
| 2.0 || 2.06 | |||
|} | |||
The following parameters apply for drilling operations. Note that the following machine settings may need to be changed for larger jobber drills: Feedrate Z, Spindle Speed. | |||
{| class="wikitable" | |||
! | Parameter || Value | |||
|- | |||
| Diameter || {Auto-filled from the DXF file import} | |||
|- | |||
| Cut Z || {Use the provided look-up table above} | |||
|- | |||
| Multi-Depth || ⬜ | |||
|- | |||
| Travel Z || 2 | |||
|- | |||
| Feedrate Z || 300 | |||
|- | |||
| Spindle Speed || 7200 | |||
|- | |||
| Dwell || ⬜ | |||
|- | |||
| Offset Z || 0 | |||
|} | |||
==== Trace Isolation ==== | |||
The tool parameters should be stored in the tool database which is loaded by default when you open FlatCAM. This section exists in case those parameters were somehow erased. | |||
The main parameters for the v-cutter are specified when purchasing the cutter. The main ones at the makerspace are specified at 0.1mm tip, 20 degree v-angle. | |||
The following table contains the milling parameters for the V-cutter. | |||
{| class="wikitable" | |||
! | Parameter || Value | |||
|- | |||
| Shape || V | |||
|- | |||
| V-Dia || 0.1440 | |||
|- | |||
| V-Angle || 20 | |||
|- | |||
| Tool Type || Finish | |||
|- | |||
| Tool Offset || Path | |||
|- | |||
| Custom Offset || 0 | |||
|- | |||
| Cut Z || -0.15 | |||
|- | |||
| MultiDepth || ⬜ | |||
|- | |||
| DPP || 0 | |||
|- | |||
| Travel Z || 2 | |||
|- | |||
| ExtraCut || ⬜ | |||
|- | |||
| E-Cut Length || 0.1 | |||
|- | |||
| Feedrate X-Y || 240 | |||
|- | |||
| Feedrate Z || 60 | |||
|- | |||
| FR Rapids || 1500 | |||
|- | |||
| Spindle Speed || 12000 | |||
|- | |||
| Dwell || ⬜ | |||
|- | |||
| Dwelltime || 1 | |||
|} | |||
The tool library settin⬜gs for the cutter's isolation parameters are unchanged because it is assumed that the passes and overlap are going to be decided on the isolation tool panel instead of from the tool library. | |||
There are two parameters for isolation milling: | |||
{| class="wikitable" | |||
! | Parameter || Value | |||
|- | |||
| Passes || {Determined on a case-by-case basis} | |||
|- | |||
| Overlap || 20% {Determined on a case-by-case basis} | |||
|} | |||
The determination for number of passes should be based on the minimum passes to ensure trace-to-trace clearance. This is largely determined by the maximum trace clearance on the PCB. Careful design and the generous use of copper fills is recommended since flatcam is not the friendliest software for non copper clearing. The following example should determine your minimum passes to be five by counting from the innermost pass to the outermost pass: | |||
[[File:Flatcam screenshot.png|600px|frameless]] | |||
The determination for overlap should be based on the clearing of copper from the board. A generated CNC job could leave large uncleared islands like the image below. A smaller overlap percentage could generate a CNC job with fewer missed islands of copper that would make following PCB production steps harder. | |||
The following image is an example of '''undesirable islands''' left in the isolation process. Results like these can be avoided by increasing the "Overlap" parameter in the table above. | |||
[[File:Flatcam islands.png|600px|frameless]] | |||
==== Edge Milling ==== | |||
Edge milling is performed with the 1.5mm burr. These are inexpensive carbide burrs originally intended for use with fiberglass, but they can be used with the PF material preferred by the makerspace. | |||
The following is a guide on how to use flatcam version 8.994 BETA to generate edge cuts following gerber edge cuts layer: | |||
<ol> | |||
<li>Edit edge cuts gerber line width to 1.5mm</li> | |||
<li>Generate non-copper regions (Utilities -> Non-Copper Regions)</li> | |||
<li>Options: Boundary Margin: 0.0001</li> | |||
<li>Manually entering parameters for edge milling is important because the software likes to crash if a tool is deleted from the tool table when performing edge milling. The following parameters should be entered instead of imported from the tool library: | |||
{| class="wikitable" | |||
! | Parameter || Value | |||
|- | |||
| Dia || 1.5 | |||
|- | |||
| Cut Z || -1.65 | |||
|- | |||
| Multi-Depth || ⬜ | |||
|- | |||
| Travel Z || 2 | |||
|- | |||
| Feedrate X-Y || 200 | |||
|- | |||
| Feedrate Z || 72 | |||
|- | |||
| Spindle Speed || 7200 | |||
|- | |||
| Dwell || ⬜ | |||
|} | |||
</li> | |||
<li>Generate CNCJob Object | |||
* Note: you will have extra lines in this CNCJob object. That is normal. | |||
</li> | |||
<li>Delete first CNCJob Object</li> | |||
<li>Delete extra geometry within the geometry object | |||
* The extra lines are completely square compared to the desired line which should follow the contour of the gerber precisely. | |||
</li> | |||
<li>Generate CNCJob Object | |||
* Note: this CNCJob should contain the correct lines. | |||
</li> | |||
</ol> | |||
==== 0.6mm Slot Milling ==== | |||
These slots are necessary for the use of USB-C connectors. This section is a work in progress. | |||
{| class="wikitable" | |||
! | Parameter || Value | |||
|- | |||
| Shape || C2 | |||
|- | |||
| Dia || 0.6 | |||
|- | |||
| Tool Type || Finish | |||
|- | |||
| Tool Offset || Path | |||
|- | |||
| Custom Offset || 0 | |||
|- | |||
| Cut Z || -1.65 | |||
|- | |||
| MultiDepth || ✅ | |||
|- | |||
| DPP || 0.4 | |||
|- | |||
| Travel Z || 0.8 | |||
|- | |||
| ExtraCut || ⬜ | |||
|- | |||
| E-Cut Length || 0.1 | |||
|- | |||
| Feedrate X-Y || 60 | |||
|- | |||
| Feedrate Z || 30 | |||
|- | |||
| FR Rapids || 1500 | |||
|- | |||
| Spindle Speed || 12000 | |||
|- | |||
| Dwell || ⬜ | |||
|- | |||
| Dwelltime || 1 | |||
|} | |||
Latest revision as of 19:21, 1 April 2024
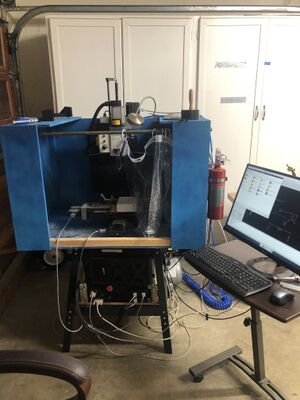
The Mini-Mill is a loan from Mr. "Breaks Everything".
Standard Operating Procedure
CNC Instructions
   1. Turn on Computer
   2. Flip power Switch to up Position
   3. Turn Estop Clockwise
   4. Login User: maglab
      Password: magcat
   5. Click on “metric” or “merica” for metric or standard interface
   6. Click Home All (important, bad things will happen if you don’t
   7. Click on file on top left and click open navigate to your g-code file
   8. Click on help for help menu
Notes:
   • Do not store g-code locally use USB drive
   • If Estop is pressed have to re-home
   • Use LinuxCNC post-processor
   • Power Off Controller Before Computer
Basic Maintenance
Quirks
Conversion was a project.
Workpiece Examples
Supplemental Resources
Brandon's Notes
He does not make good notes.
Use the following settings in the Fusion 360 postprocessor (after selecting the emc2 linuxcnc post):
- Safe Retracts and Home Positioning
- Safe Retracts: G28
Try to use G54 instead of G53 because it's less scary.
FlatCAM Parameters
There are three different types of operations that go into CNC milling a PCB: hole drilling, trace isolation, and edge milling. Each of these operations will get its own section under this guide.
Hole Drilling
Hole drilling is accomplished with the variety of 1/8" shank jobber drills provided next to the CNC. The following equation is used to calculate the length that the drill needs to be passed into the PCB in order to clear a hole: . A tabular version is provided below for each 0.1mm increment:
| Drill Diameter | Depth |
|---|---|
| 0.6 | 1.77 |
| 0.7 | 1.79 |
| 0.8 | 1.82 |
| 0.9 | 1.84 |
| 1.0 | 1.86 |
| 1.1 | 1.88 |
| 1.2 | 1.90 |
| 1.3 | 1.92 |
| 1.4 | 1.94 |
| 1.5 | 1.96 |
| 1.6 | 1.98 |
| 1.7 | 2.00 |
| 1.8 | 2.02 |
| 1.9 | 2.04 |
| 2.0 | 2.06 |
The following parameters apply for drilling operations. Note that the following machine settings may need to be changed for larger jobber drills: Feedrate Z, Spindle Speed.
| Parameter | Value |
|---|---|
| Diameter | {Auto-filled from the DXF file import} |
| Cut Z | {Use the provided look-up table above} |
| Multi-Depth | ⬜ |
| Travel Z | 2 |
| Feedrate Z | 300 |
| Spindle Speed | 7200 |
| Dwell | ⬜ |
| Offset Z | 0 |
Trace Isolation
The tool parameters should be stored in the tool database which is loaded by default when you open FlatCAM. This section exists in case those parameters were somehow erased.
The main parameters for the v-cutter are specified when purchasing the cutter. The main ones at the makerspace are specified at 0.1mm tip, 20 degree v-angle.
The following table contains the milling parameters for the V-cutter.
| Parameter | Value |
|---|---|
| Shape | V |
| V-Dia | 0.1440 |
| V-Angle | 20 |
| Tool Type | Finish |
| Tool Offset | Path |
| Custom Offset | 0 |
| Cut Z | -0.15 |
| MultiDepth | ⬜ |
| DPP | 0 |
| Travel Z | 2 |
| ExtraCut | ⬜ |
| E-Cut Length | 0.1 |
| Feedrate X-Y | 240 |
| Feedrate Z | 60 |
| FR Rapids | 1500 |
| Spindle Speed | 12000 |
| Dwell | ⬜ |
| Dwelltime | 1 |
The tool library settin⬜gs for the cutter's isolation parameters are unchanged because it is assumed that the passes and overlap are going to be decided on the isolation tool panel instead of from the tool library.
There are two parameters for isolation milling:
| Parameter | Value |
|---|---|
| Passes | {Determined on a case-by-case basis} |
| Overlap | 20% {Determined on a case-by-case basis} |
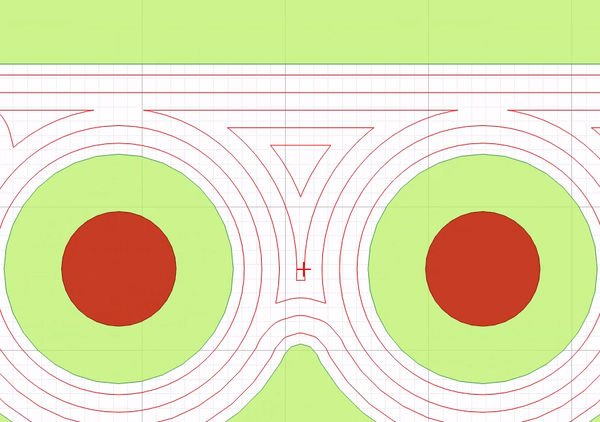
The determination for number of passes should be based on the minimum passes to ensure trace-to-trace clearance. This is largely determined by the maximum trace clearance on the PCB. Careful design and the generous use of copper fills is recommended since flatcam is not the friendliest software for non copper clearing. The following example should determine your minimum passes to be five by counting from the innermost pass to the outermost pass:
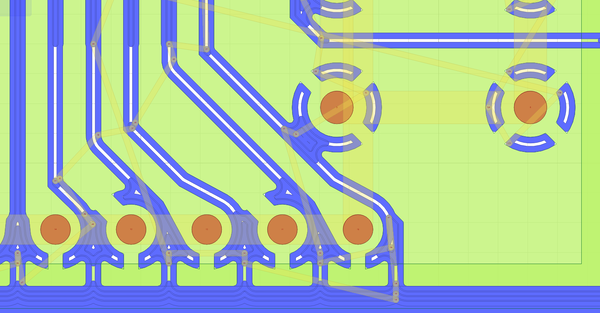
The determination for overlap should be based on the clearing of copper from the board. A generated CNC job could leave large uncleared islands like the image below. A smaller overlap percentage could generate a CNC job with fewer missed islands of copper that would make following PCB production steps harder.
The following image is an example of undesirable islands left in the isolation process. Results like these can be avoided by increasing the "Overlap" parameter in the table above.
Edge Milling
Edge milling is performed with the 1.5mm burr. These are inexpensive carbide burrs originally intended for use with fiberglass, but they can be used with the PF material preferred by the makerspace.
The following is a guide on how to use flatcam version 8.994 BETA to generate edge cuts following gerber edge cuts layer:
- Edit edge cuts gerber line width to 1.5mm
- Generate non-copper regions (Utilities -> Non-Copper Regions)
- Options: Boundary Margin: 0.0001
- Manually entering parameters for edge milling is important because the software likes to crash if a tool is deleted from the tool table when performing edge milling. The following parameters should be entered instead of imported from the tool library:
Parameter Value Dia 1.5 Cut Z -1.65 Multi-Depth ⬜ Travel Z 2 Feedrate X-Y 200 Feedrate Z 72 Spindle Speed 7200 Dwell ⬜ - Generate CNCJob Object
- Note: you will have extra lines in this CNCJob object. That is normal.
- Delete first CNCJob Object
- Delete extra geometry within the geometry object
- The extra lines are completely square compared to the desired line which should follow the contour of the gerber precisely.
- Generate CNCJob Object
- Note: this CNCJob should contain the correct lines.
0.6mm Slot Milling
These slots are necessary for the use of USB-C connectors. This section is a work in progress.
| Parameter | Value |
|---|---|
| Shape | C2 |
| Dia | 0.6 |
| Tool Type | Finish |
| Tool Offset | Path |
| Custom Offset | 0 |
| Cut Z | -1.65 |
| MultiDepth | ✅ |
| DPP | 0.4 |
| Travel Z | 0.8 |
| ExtraCut | ⬜ |
| E-Cut Length | 0.1 |
| Feedrate X-Y | 60 |
| Feedrate Z | 30 |
| FR Rapids | 1500 |
| Spindle Speed | 12000 |
| Dwell | ⬜ |
| Dwelltime | 1 |


