Mantis Stereo Microscope: Difference between revisions
(Created page) |
(Added images, infobox, basic operation, and cautions) |
||
| Line 1: | Line 1: | ||
{| class="wikitable" style="float:right;" | |||
|+Mantis Original | |||
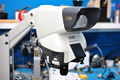
|[[File:Mantis_Right.JPG|300px]]<br/> | |||
'''Location:''' Clamped to soldering workbench <br/> | |||
'''Ownership:''' MagLab (???)<br/> | |||
'''Status:''' Fully Working<br/> | |||
'''Usage Restrictions:''' None | |||
|- | |||
!Microscope | |||
|- | |||
|'''Type:''' Optical, Reflective, Stereo <br/> | |||
'''Lighting:''' Built-in | |||
|- | |||
!Lens Slot 1 | |||
|- | |||
| ''Vision Engineering M009'' <br/> | |||
'''Magnification:''' 10X Objective <br/> | |||
'''Working Distance:''' 41 mm ~ 1.6 in. <br/> | |||
'''Field of View:''' 12 mm ~ 0.5 in. <br/> | |||
'''Depth of Field:''' 2.5 mm ~ 0.1 in. | |||
|- | |||
!Lens Slot 2 | |||
|- | |||
| No lens installed in this slot | |||
|- | |||
!References | |||
|- | |||
| [http://www.visioneng.us/products/discontinued/original-mantis-spares-and-support Product Page] <br/> [https://www.cmm.com.mx/pdf/vision%20engeneering/mantis/Mantis%20Operators%20Manual.pdf User Manual] | |||
|} | |||
The '''Mantis Stereo Magnifier Microscope''' is a low-magnification viewing system that is useful for inspecting small workpieces such as printed circuit boards. It was made by Vision Engineering, who now calls it the '''Original Mantis''' since it was discontinued and replaced by newer models. | |||
== Basic Operation == | |||
# Turn on the lighting using the rocker switch on the clamp base. | |||
# Select a lens to use by pulling or pushing the lens selection lever on the left side of the microscope towards or away from you. The lens turret will rotate the selected lens into place. | |||
# Move the microscope so that your workpiece is at the proper working distance for the lens. Check the infobox at the right of this page to find out the working distance for each installed lens. | |||
# Adjust the focus by moving either the microscope or workpiece up or down. | |||
# Adjust the pupillary distance using the adjustment knob on the right side of the viewport until the view fills your vision and your eyes are comfortable. | |||
== Cautions and Warnings == | |||
* The incandescent light bulbs on the bottom of the viewer unit get very hot. Avoid touching them and turn them off after use. | |||
* Use a fan to blow away fumes when soldering under the microscope. Otherwise, the objective lens may become coated with debris. | |||
== Gallery == | |||
<gallery> | |||
File:Mantis_Right.JPG|Right side of the microscope, with pupillary distance adjustment knob (top) and lighting intensity slider (bottom) visible. | |||
File:Mantis_Left.JPG|Left side of the microscope, with lens selection lever (bottom left) and light bulb hatch release button (bottom right) visible. | |||
</gallery> | |||
== External Links == | == External Links == | ||
[https://en.wikipedia.org/wiki/Stereo_microscope Stereo microscope on Wikipedia] | [https://en.wikipedia.org/wiki/Stereo_microscope Stereo microscope on Wikipedia] | ||
Revision as of 23:14, 9 September 2018
 Location: Clamped to soldering workbench |
| Microscope |
|---|
| Type: Optical, Reflective, Stereo Lighting: Built-in |
| Lens Slot 1 |
| Vision Engineering M009 Magnification: 10X Objective |
| Lens Slot 2 |
| No lens installed in this slot |
| References |
| Product Page User Manual |
The Mantis Stereo Magnifier Microscope is a low-magnification viewing system that is useful for inspecting small workpieces such as printed circuit boards. It was made by Vision Engineering, who now calls it the Original Mantis since it was discontinued and replaced by newer models.
Basic Operation
- Turn on the lighting using the rocker switch on the clamp base.
- Select a lens to use by pulling or pushing the lens selection lever on the left side of the microscope towards or away from you. The lens turret will rotate the selected lens into place.
- Move the microscope so that your workpiece is at the proper working distance for the lens. Check the infobox at the right of this page to find out the working distance for each installed lens.
- Adjust the focus by moving either the microscope or workpiece up or down.
- Adjust the pupillary distance using the adjustment knob on the right side of the viewport until the view fills your vision and your eyes are comfortable.
Cautions and Warnings
- The incandescent light bulbs on the bottom of the viewer unit get very hot. Avoid touching them and turn them off after use.
- Use a fan to blow away fumes when soldering under the microscope. Otherwise, the objective lens may become coated with debris.
Gallery

Right side of the microscope, with pupillary distance adjustment knob (top) and lighting intensity slider (bottom) visible.
Left side of the microscope, with lens selection lever (bottom left) and light bulb hatch release button (bottom right) visible.
