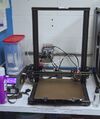
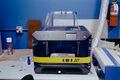
Monoprice Maker Select 3D Printer V2
| Monoprice Maker Select V2 3D Printer (IIIP) |
|---|
|
|
| 3D Printer |
|
Brand: Monoprice (MP)
Materials: ABS, PLA |

Introductory Information
Leveling Journey
The IIIP was donated by Jeff after it failed to level for too long after a glass build plate upgrade. It was indeed nonlinear to level even with our best 3d printer technicians.
The old formed sheetmetal base was upgraded to a thick aluminum sheetmetal base and leveling was tried with that. It was still relatively nonlinear to level.
It leveled fine with the glass build plate removed and an adhesive PEI sheet applied. It has remained with the adhesive PEI sheet to this date.
Behind the Name
Since the stylized Monoprice logo (MP) looks like IIIP, this printer is nicknamed the IIIP.
Components
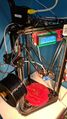
Hotend Journey
The hotend is currently "upgraded" with a chinesium bimetal hotend. There is a stainless steel heatbreak section which is threaded (and locked with JB-weld) onto a copper section where the thermistor cooling is. We do not have formal testing data to show if the heatbreak performs better or worse than the original PTFE-lined hotend. The original PTFE-lined hotend and compatible extruder tip should still be stored in a plastic bag somewhere in the electronics room.
The hotend thermistor was deemed inoperable in late 2021, and the printer was placed onto the makerspace "do not fix" list. The software compensation that was applied to the thermistor had it set so hot that the 3d printer would falsely report hotend overheats. It has since been replaced as part of a creality and IIIP thermistor replacement project in 2022-07-20.
Power Supply
The Wanhao i3 Plus runs 24 volts.
Controller Board
The controller board is the standard wanhao "duplicator i3 plus" v5.1 motherboard. The microstepping drivers are the allegro A4988ET.
It is currently running ADVi3++ version 5.5.0.
LCD Board
The LCD assembly is the DGUS-capable DMT48270M043_02WT.
It is currently running ADVi3++ LCD version 5.5.0.
Printer Settings
The dimensions of the print volume can be read on the printer card shown on this wiki page. The print origin is not in the center of the print bed.
Part Cooling
The maximum fan speed is recommended at 40%. A lower fan speed (20%) should be used during normal printing.
Print Speed
The maximum print speed of 50mm/s is recommended. Faster printing causes uncomfortable rattling.
Acceleration is enabled and can be utilized for a better 3d print finish and less printer noise.
Travel
Retraction Distance 1.5mm, maybe less. Retraction Speed 30mm, maybe more. Z-hop when retracted recommended on all printers. Z-hop height 1.0mm.
Start G-Code
This start g-code prints the "double line" on the left side of the bed to wipe the 3d printer nozzle.
G21 ;metric values
G90 ;absolute positioning
M82 ;set extruder to absolute mode
M107 ;start with the fan off
G28 X0 Y0 ;move X/Y to min endstops
G28 Z0 ;move Z to min endstops
G1 Z15.0 F{speed_travel} ;move the platform down 15mm
G92 E0 ;zero the extruded length
G1 F200 E2 ;extrude 2 mm of feed stock
G92 E0 ;zero the extruded length again
G1 F{speed_travel}
G1 X10.1 Y20 Z0.28 F5000.0 ;Move to start position
G1 X10.1 Y180.0 Z0.28 F1000.0 E15 ;Draw the first line
G1 X10.4 Y180.0 Z0.28 F5000.0 ;Move to side a little
G1 X10.4 Y20 Z0.28 F1000.0 E30 ;Draw the second line

;Put printing message on LCD screen
M117 Printing...
End G-Code
M104 S0 ;extruder heater off
G91 ;relative positioning
G1 E-1 F300  ;retract the filament a bit before lifting the nozzle, to release some of the pressure
G1 Z+0.5 E-5 X-20 Y-20 F{speed_travel} ;move Z up a bit and retract filament even more
G28 X0 Y0 ;move X/Y to min endstops, so the head is out of the way
M84 ;steppers off
G90 ;absolute positioning
Operators' Log
Brandon 2022-12-17
The 3d printer has been sitting stale for some time with ABS loaded. It was decided that all 3d printers should be in operational state, so a trial print effort to bring the printer out of staleness was attempted. The favorite "low effort" trial print was selected by the operator: chatlowpoly. The following is a list of trial numbers along with the changes made after the print.
- First trial print with chatlowpoly, acceleration set on printer because acceleration noises are cool. The print was only completed until the first layer since a bit of stuff on the nozzle was colliding with the part cooling duct.
- Default material temperature of 200C good.
- Operator's chosen 65C bed temperature good.
- Part cooling too high, reduced to 30% following print.
- Second trial print, completed until very evident Y axis skipping
- acceleration does not work. Disabled.
- printing too fast? Not sure if acceleration caused Y axis skipping or if the speed did.
- Third trial print, successful but shaky.
- Too fast, but did not cause Y axis skipping. 60mm/s infill speed reduced to 50mm/s. First layer speed set to 18mm/s.
- Retraction amount reduced from 6.5mm to 1.5mm. Retraction hop set to 2.0mm.
- Fourth trial print, successful? Operator left after first layer.
- 1.0mm Retraction hop set. 2.0mm is too high...
A final list of parameters that were changed from default should be provided eventually.
Brandon 2023-01-05
A previous qualification print was made after the ADVi3++ firmware was loaded.
A print made on this day has a lot of ringing on the Y axis and hints at bed leveling (bed too low) issues. A re-level is needed.
Brandon 2023-01-10
The way the filament in the dry box is dispensed into the 3d printer seems problematic since there can be high bending stress placed on the filament at the opening of the direct drive extruder. The operator has temporarily solved this with a crude arrangement utilizing available materials to space the dry box above another dry box.
Additionally, the extrusion steps per millimeter multiplier was not calibrated with the 3d printer. This has been remedied. It is set at 97 steps / mm at the time of this note.
The initial layer extrusion needs a slightly higher flow ratio for better initial layer adhesion; this can be applied in Cura.
Brandon 2023-03-09
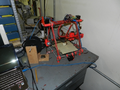
The IIIP was moved briefly during a time when MAG Laboratory was lent a Form 1 in hopes that the Form 1 could be fixed. Because of this, it was decided that the printer would be due for a delta test print. The operator at the same time wanted to try a new test print, the YACS. The desire to print the YACS was further enforced by relative skews noticed while the printer was used to make another filament drybox.
Upon printing the XY skew print, the operator did not notice any differences. The measurements were as follows:
- AB = 141.10 mm
- BD = 141.10 mm
However, the XZ test showed at least 3mm of positive skew. Since the bottom of the print was not designed for exact measurements like the print on the XY print was, no sub-millimeter measurements are provided in this text. After this print, the Z axes were checked and these checks revealed that the left side Y axis was not secured. Note that the left axis refers to the operator's left and not the printer's.
The operator secured the left side Y axis motor grub screw and re-leveled the X carriage and print bed. The next XZ axis print revealed no abnormalities and no desired corrections to be applied.
The YZ test completed without note. Although the print did get smaller in size as the print layers increased, a millimeter or less difference was observed which does not constitute reason for applying a print offset or examining the Y axis hardware.
Although there are already three other test prints that are used by MAG Laboratory, a third test print could be beneficial to operational success.
Other 3D Printers
This is a part of our ongoing effort to document our 3D printers.
RepRap Mendel 3D Printer